
Canvas
Visit the Canvas Guides for helpful resources straight from the source!
Canvas is the college’s exclusive learning management system!
Canvas is an intuitive learning management system from Instructure that includes many tools to facilitate effective communication and interaction. Instructors are able to easily design, build, and manage courses. Canvas is available to all Waubonsee employees to create dynamic, engaging spaces for teams, committees, groups, and more.
All Waubonsee faculty must successfully complete the Growing with Canvas training prior to delivering any Flex, Hybrid, or Online courses. The Canvas training is available online and is contextualized to Waubonsee. The training is focused on how to use Canvas tools to advance Waubonsee's goals of equity and student success through inclusive teaching excellence.
To learn more about Canvas, please review the content on this page and visit the resources on the Instructure Canvas site.
Canvas Apps
Help!
Need help with Canvas? Contact the Technical Assistance Center (TAC) or the Canvas Support Hotline is available 24/7 at 1-833-201-9762.
Canvas Chat Support, Canvas Guides, and the Canvas Training Portal are also available 24x7 through the 'Help' button in Canvas.

How-to Guides
Canvas Guides
Publish a Course
Publish a Course
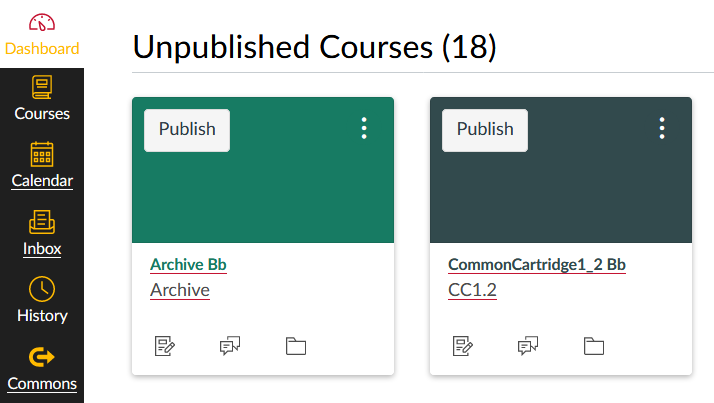
Every term, courses need to be published before students are able to join a course. It is recommended that your course is published at least two weeks before the term begins. Remember -- All your course content does not need to be immediately published, just the course!
You can easily publish courses from the Dashboard by clicking the 'Publish' button on a course. All unpublished courses are listed in their own category:
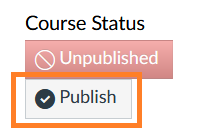
Courses can also be published individually by clicking on the 'Publish' button on the course's homepage:
Accessibility Checker
Accessibility Checker
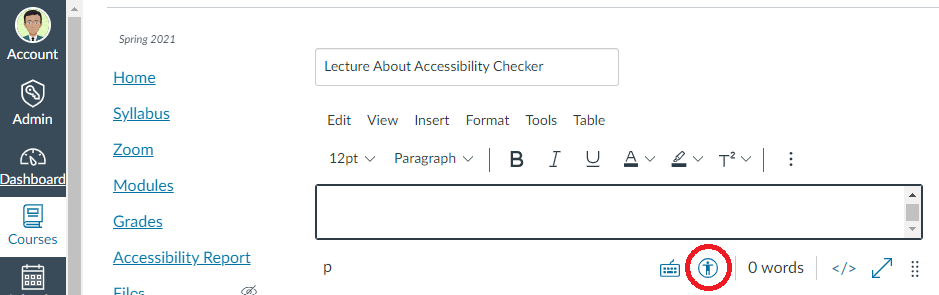
Canvas has a built-in Accessibility Checker in the Rich Content Editor. For more information, please check out 'How do I use the Accessibility Checker in the Rich Content Editor as an instructor?' on Canvas Community Forum. To access the Accessibility Checker, click the 'Accessibility Checker' icon below the editing area.
Since it only checks the existing content in the editor area, the Checker should be used only after the content is entered. Here we use construction of a common content page that contains text, links, and images as an example and summarize the general accessibility issues the Accessibility Checker examines.
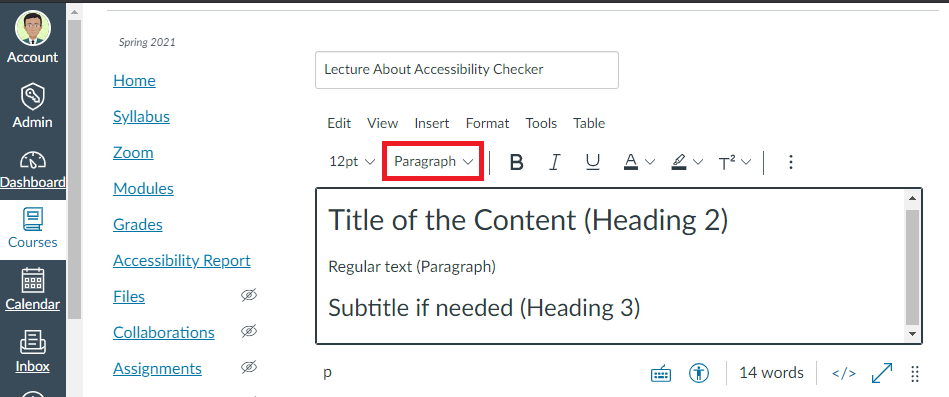
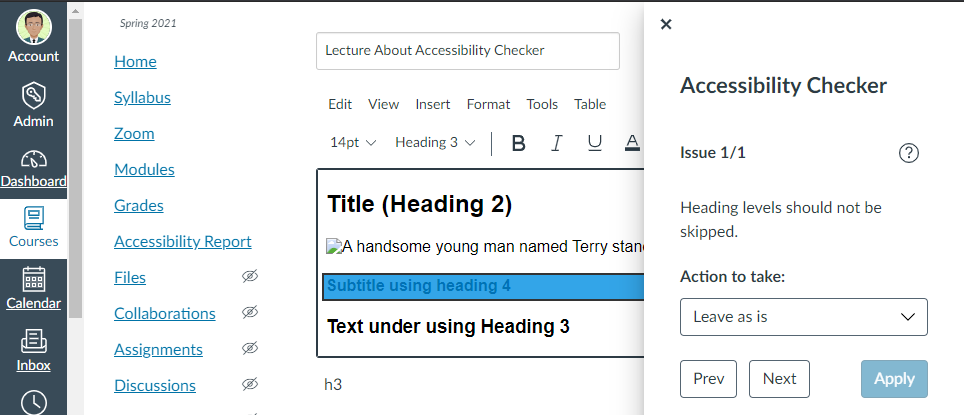
Text entry: When text is entered, a hierarchy of headings should be used.
The 'Paragraph' button allows you to select different headings. Heading 1 is reserved for the page title; in this example, the box states 'Lecture About Accessibility Checker' in the image. The Title of the text in the editor starts with Heading 2, and the subtitle will in turn use Heading 3. They must be in order. Nonetheless, headings can be repeated. If you have multiple subtitles, you should use Heading 3 for all of them for consistency. The text between titles/subtitles should stay as Paragraph.
A bit more about text:
Avoid adding highlighted background or text colors unnecessarily. Contrast allows content to be distinguishable. Digitally, black and white have the greatest contrast. Larger text size could also be helpful. When more colors are used, they are bridging the gap and the content becomes less distinguishable. This is analogous to a jigsaw puzzle with lots of trees. It is difficult to distinguish the jigsaw pieces using the green colors. Poor contrast is like seeing shades of the same color.
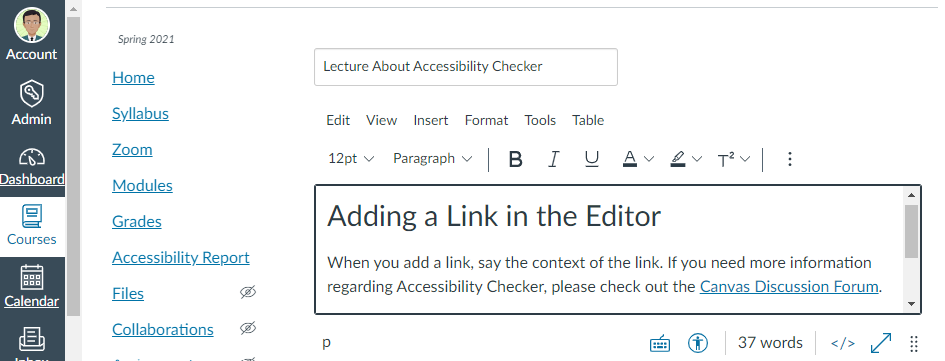
Links: Avoid using URL or phrases such as 'click here.'
Why shouldn't we use 'click here'? A content page typically has many hyperlinks. If we scroll down the page and skip the context, it is challenging to identify which one we should click. When the text is meaningful and clear, it is more convenient for everyone to understand the purpose of that link. This goes the same as URL.
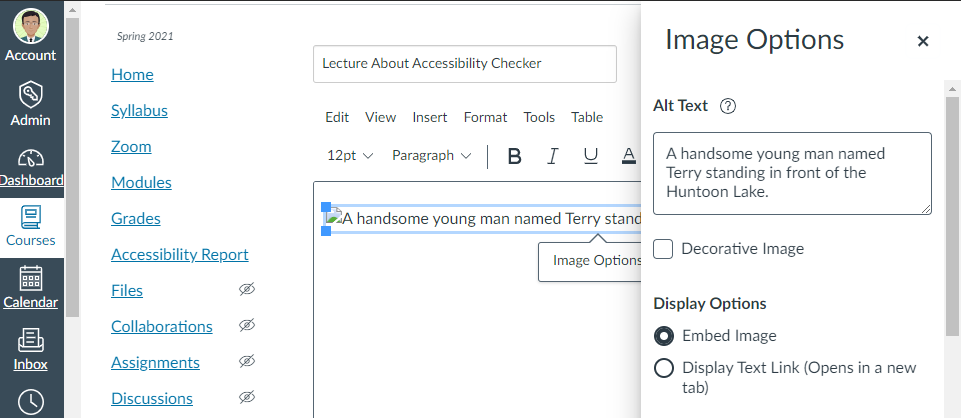
Images: Alt Text should be added for important details
While an image could have a lot of information, alt text only needs to include relevant information. There are different reasons an image may not load properly. For example, a slow wi-fi connection. When an image disappears, the reader may be confused. However, if you add alt text, then the audience would know what the image is about. If it is a data graph or an artwork, even when the image appears properly, the alt text can be very helpful. Not only does it provide a clear description, but it also helps students understand the intent of the image.
Accessibility Checker in Action:
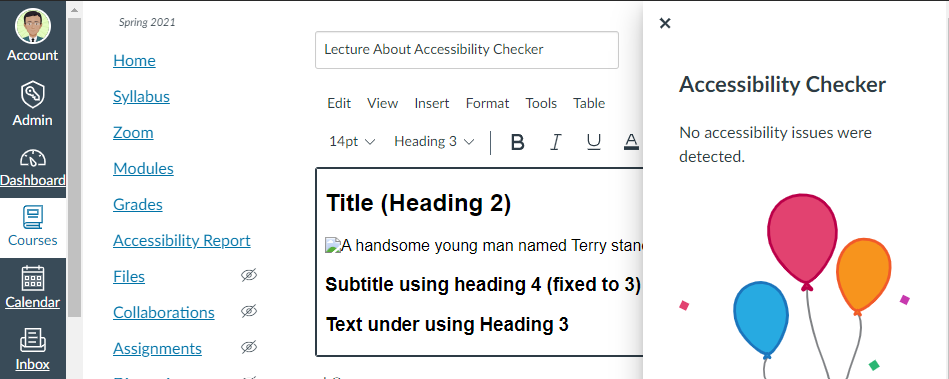
In this example, the subtitle uses Heading 4 instead of Heading 3. Since the Title uses Heading 2, the Accessibility Checker displays the issue. At the same time, it provides a list of choices under 'Action to take:' and helps you adjust the content. The automatic fix option in this case adjusts the subtitle using Heading 3. Since a page can help multiple subtitles, two places could use Heading 3. If it is not your intent, then you may have to further adjust the content so that the text will have the appropriate semantic meaning. After all issues are fixed or no issues are found, you will see an image with balloons.
Add a Course User
Add a Course User
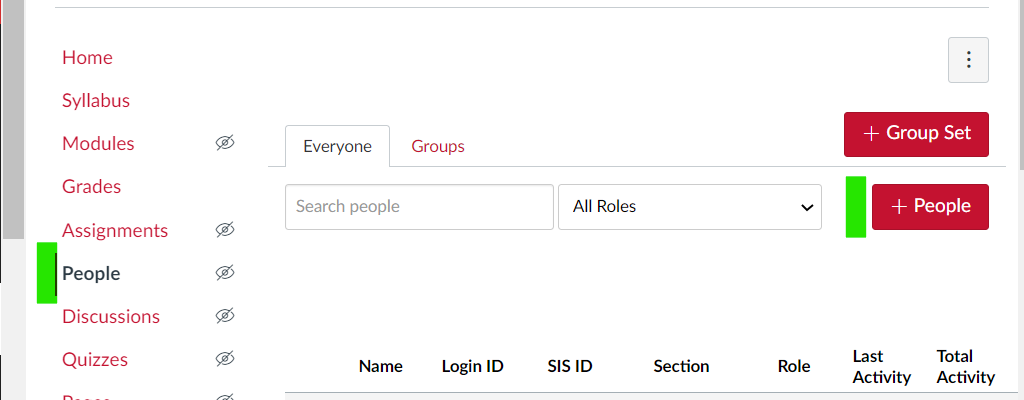
An Instructor, or a person who is assigned with the Teacher role for a course, can add users to a course shell. Click 'People' on the navigation menu.
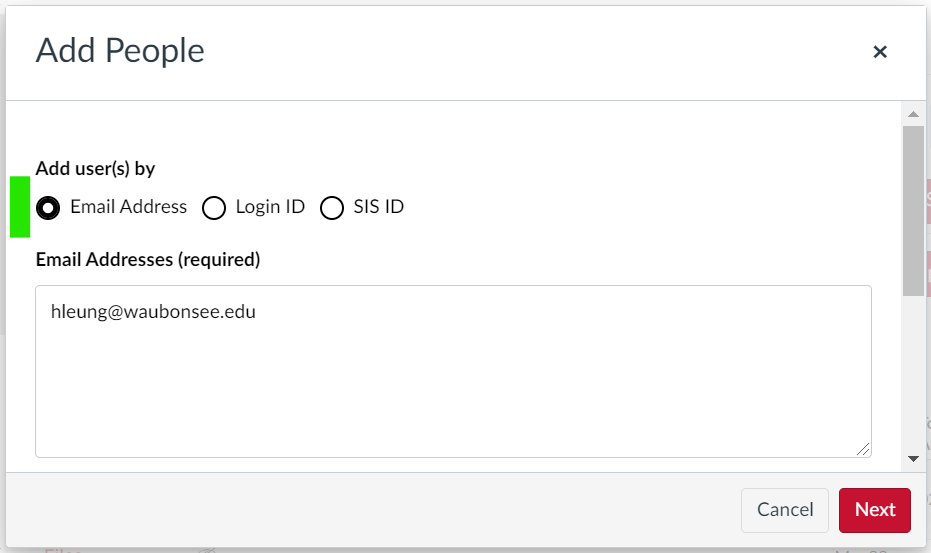
The red +People button will allow you to add a user using their Waubonsee email address or their Login ID (x-number).
You can add a list of users by copying and pasting their email addresses in the box or by adding a list of x-numbers. In that case, you don't have to add them one by one.
Click the 'Next' button. A new pop-up window will appear to confirm. Click the 'Add User' button to confirm and Canvas will send a notification to the person you just added.
Add a Course User: Permissions
When you add a new course user, you can also select a role for them. The default role is the 'Student', but other roles are also available with the following permissions:
|
Role / Permission |
Student | Tutor | Teacher | TA | Navigator | Academic Coach | Designer | Observer | Librarian | OAC |
|---|---|---|---|---|---|---|---|---|---|---|
| View Analytics | ✅ | ✅ | ✅ | ✅ | ||||||
| View Announcements |
✅ | ✅ | ✅ | ✅ | ✅ | ✅ | ✅ | ✅ | ✅ | |
| Send Conversations to Entire Class |
✅ | ✅ | ✅ | ✅ | ✅ | ✅ | ✅ | |||
| Send Conversations to Individuals |
✅ | ✅ | ✅ | ✅ | ✅ | ✅ | ✅ | ✅ | ||
| Manage Calendar | ✅ | ✅ | ✅ | ✅ | ✅ | |||||
| Change Course Visibility | ✅ | ✅ | ✅ | ✅ | ✅ | ✅ | ||||
| View Course Usage Reports | ✅ | ✅ | ✅ | ✅ | ✅ | |||||
| Manage Groups |
✅ | ✅ | ✅ | ✅ | ✅ | |||||
| Create Discussions |
✅ | ✅ | ✅ | ✅ | ✅ | ✅ | ✅ | ✅ | ||
| Moderate Discussions | ✅ | ✅ | ✅ | ✅ | ✅ | ✅ | ||||
| Post Discussions | ✅ | ✅ | ✅ | ✅ | ✅ | ✅ | ✅ | ✅ | ||
| View Discussions | ✅ | ✅ | ✅ | ✅ | ✅ | ✅ | ✅ | ✅ | ✅ | |
| Edit Student Grades | ✅ | ✅ | ||||||||
| Select Final Grades | ✅ | ✅ | ||||||||
| Outcomes | ✅ | ✅ | ✅ | |||||||
| Manage Question Banks | ✅ | ✅ | ✅ | ✅ | ✅ | |||||
| Manage Assignments | ✅ | ✅ | ✅ | ✅ | ✅ | ✅ | ||||
| Manage Courses | ✅ | |||||||||
| Manage Pages | ✅ | ✅ | ✅ | ✅ | ✅ | |||||
| Manage Groups | ✅ | ✅ | ✅ | ✅ | ✅ | |||||
| Rubrics | ✅ | ✅ | ✅ | ✅ | ✅ | ✅ | ||||
| View SIS Data | ✅ | |||||||||
| Student Collaborations | ✅ | ✅ | ✅ | ✅ | ✅ | ✅ | ✅ | |||
| Submit on Behalf of Students | ✅ | ✅ | ||||||||
| Add Students | ✅ | ✅ | ||||||||
| Add Other Course Roles | ✅ | |||||||||
| Course Settings | ✅ | ✅ | ||||||||
| Manage Students | ✅ | ✅ | ✅ | ✅ | ||||||
| View Students | ✅ | ✅ | ✅ | ✅ | ✅ | ✅ | ✅ | |||
| View Student Email Address | ✅ | ✅ | ✅ | ✅ | ✅ | ✅ |
Add or Adjust Quiz Settings for a Student
Add or Adjust Quiz Settings for a Student
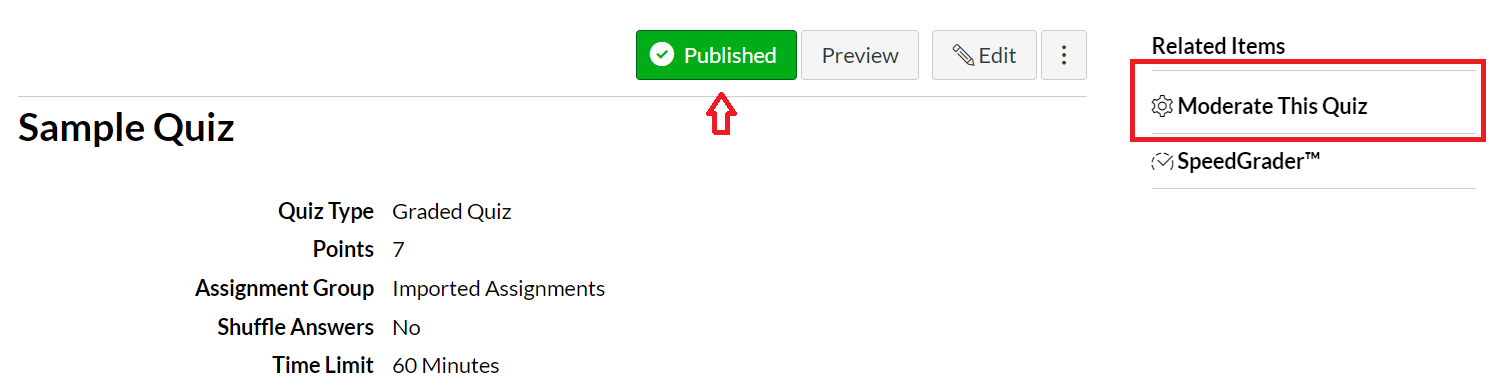
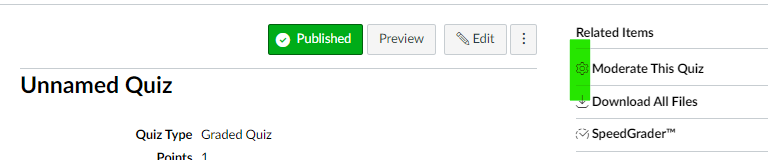
If you would like to add extra time or to provide an extra attempt for a student to complete a Quiz, it is important to first publish the Quiz. Otherwise, the 'Moderate a Quiz' option would not be available.
To add another attempt or extra time:
- Click the 'Moderate This Quiz' option
- Select the 'Edit' option for the specific student
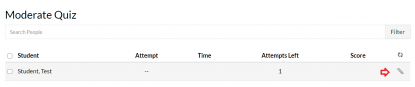
- Add/Adjust the extra attempt or extra time (not total)
- Save the change
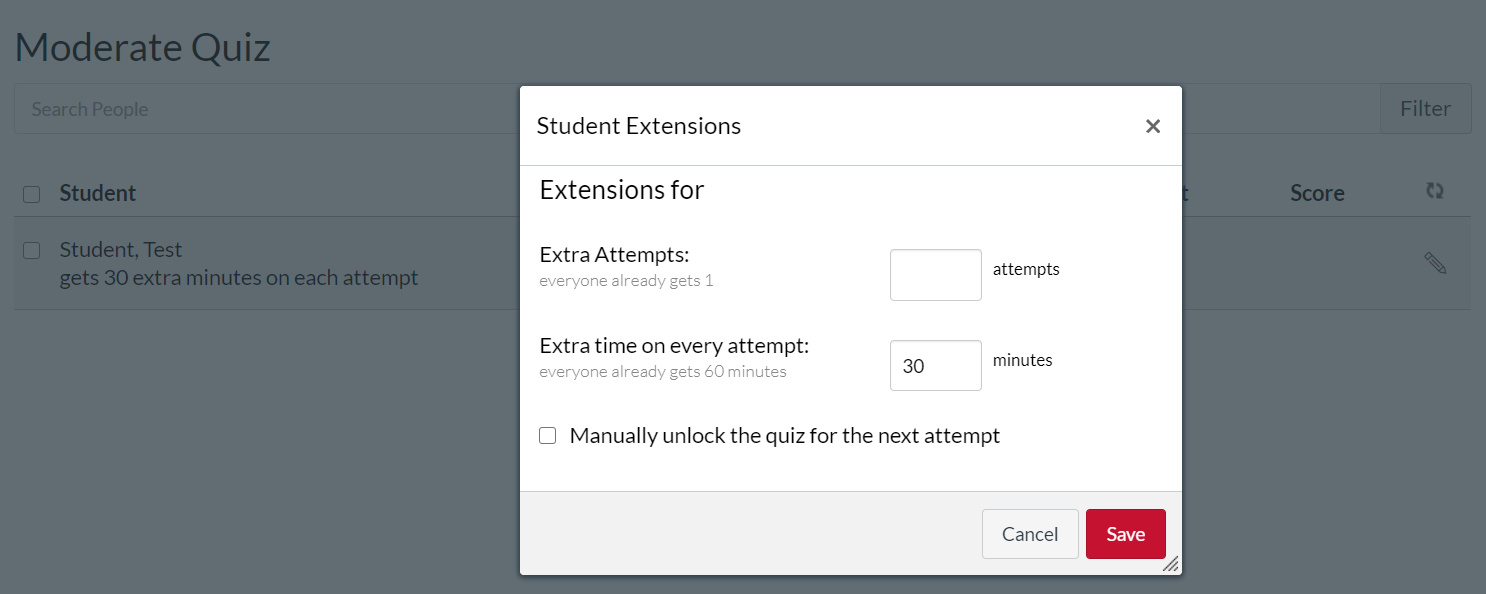
- Confirm the changes for the student
Assignment submission options
Assignment submission options
Assignments can be setup to allow for specific submission types:
- No Submission - This is the default option and will not allow for any submission by students.
- Online - One or multiple online entry options may be selected.
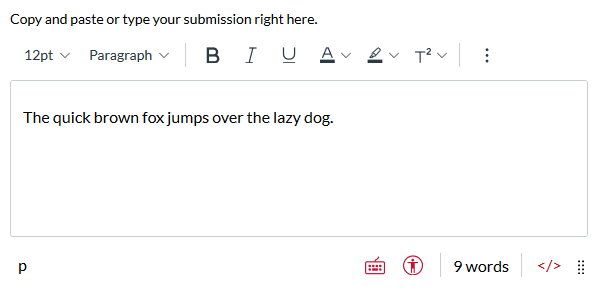
- Text Entry - The Rich Content Editor will be available to students:
- Website URL - Students will be prompted to submit a link:

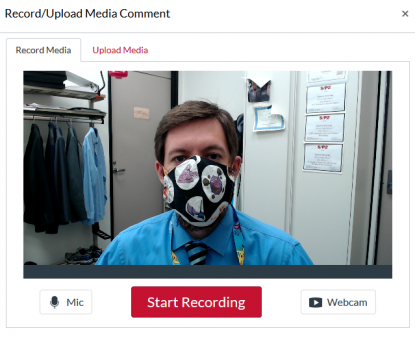
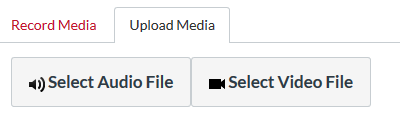
- Media Recordings - Students are able to directly record audio and/or video from their device or upload previously recorded audio recordings or videos:
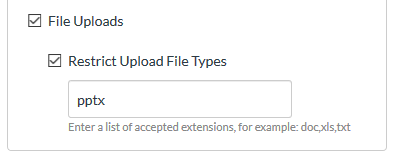
- File Uploads - Students are allowed to upload files from their device. This may additionally be restricted to specific file types such as pptx, docx, pdf, etc.:
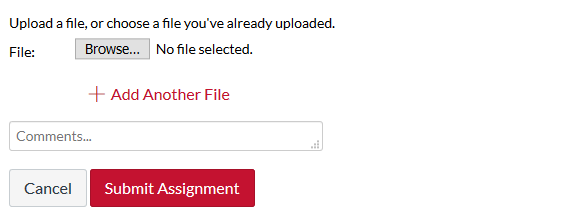
- Text Entry - The Rich Content Editor will be available to students:
- On Paper - Paper submissions must be collected from students outside of Canvas. This option is helpful for face-to-face assignments that will be collected in person, but should still exist in the grade book.
- External Tool - External tools such as library or publisher content that exist outside of Canvas.
Change a Course Homepage 🎥
Change a Course Homepage 🎥
Please review the video or step-by-step instructions to learn how to change a course homepage.
Video Overview
Step by Step Instructions
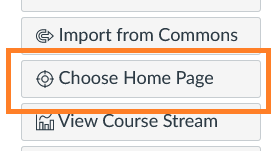
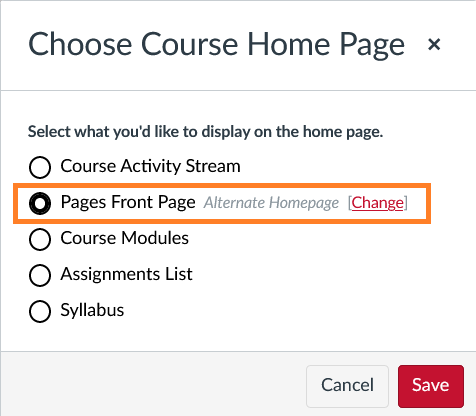
- From the current homepage, click: 'Choose Home Page'
-
- On the modal box that will appear, choose 'Pages Front Page' and click 'Change'
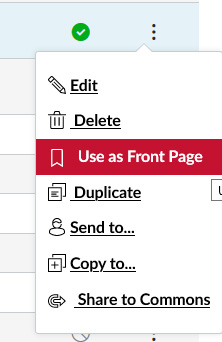
-
- For the desired page select the 'Use as Front Page' option
-
Create a new copy of an existing Canvas course
Create a new copy of an existing Canvas course
This function creates a new course shell and duplicates the content. For an actual course, see the instructions for 'Import Content from another Canvas shell'.
- Find Settings at the left lower corner, click 'Copy this Course' on the right hand side
- Choose the content to import
- 'Select Specific Content' allows you to select particular items (e.g. a single Assignment) before importing
- 'All content' will import everything from the source as in true Course Copy
- If you chose 'All content' in Step 2, you may check 'Adjust events and due dates' to adjust the first date of the semester
- Click the 'Create Course' button
- If you chose 'Select Specific Content' in Step 2, click the 'Select Content' button next to the progress bar
- On the pop-up window, pick the items to import and click the 'Select Content' button at the bottom of the pop-up
Cross-List Courses
Cross-List Courses
If you have multiple sections of the same course, you could merge the course shells together. The function is called 'cross-list.' However, always be mindful of FERPA. At Waubonsee, each section is an individual course. Therefore, it is important to separate students of one section from students of a different section in a discussion forum. Please contact our office if you would like support creating discussion board assignments. To merge one course with another:
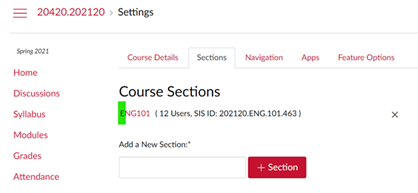
- Go to Settings of one of the shells. We recommend you start in the child shell and cross list with the parent shell. This ensures that the child shell sees the parent shell's content.
- Click the Sections tab and then the Course name (e.g. ENG101)
- On the right hand side of the new screen, click the gray 'Cross-List this Section' button
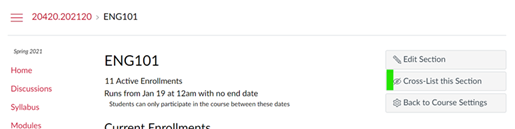
- A new pop-up window will allow you to search for the other course to merge
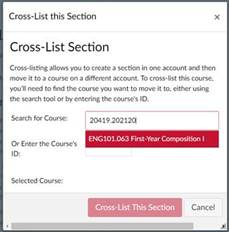
- Select the course and click the red 'Cross-List This Section' button
- Then, you should see that a gray 'De-Cross-List' button will replace the gray 'Cross-List this Course' button. The 'De-Cross-List' button allows you to reverse the cross-listing process
- To confirm that the cross-listing process was successful, click People to show two rosters listed as one
- If there are additional courses to merge, repeat Steps 1 through 7
Note: The default 'Course Evaluations' menu link will only work correctly for students native to the parent course. In order to complete course evaluations, students from any other section should be provided a direct link to the AEFIS Dashboard (https://wcc.aefis.net/).
This can be accomplished several ways; we recommend:
- Communicating to students via the Canvas Inbox
- Replacing the default 'Course Evaluations' menu link with a redirect app that goes to the AEFIS Dashboard instead (make sure to remove the default menu item after making the new one!)
- Adding a page or external URL to a module
Embed a Video
Embed a Video
There are different methods to embed videos in Canvas depending on where the video is located.
Embed MyMedia Videos in Canvas:
- If your video is already in mymedia, skip to step 4
- Go to mymedia
- Use Media Upload to upload the video
- Go to your Canvas course shell, and create a Page under the module

- Open the Page, and click Edit
- Click the Rich Content Editor so that the editor area becomes the focus
- Click the "plugin" icon in the tool bar (it looks like an electric plug)

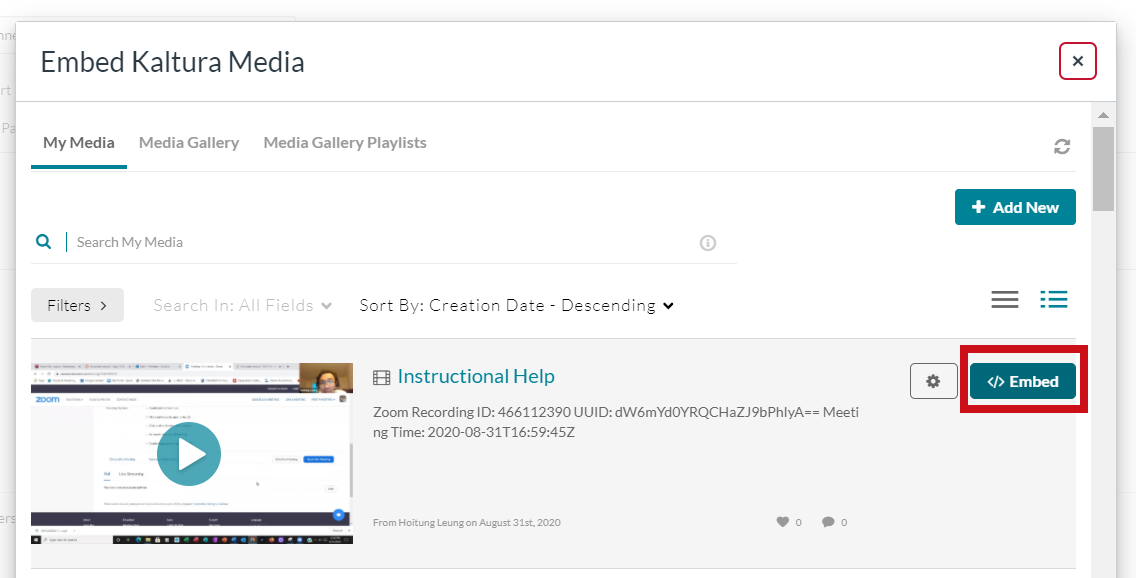
- Select the text: 'Embed Kaltura Media'
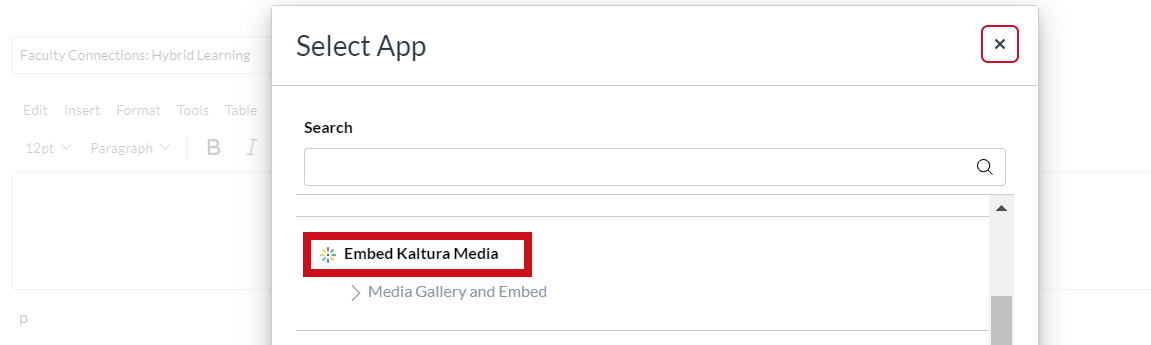
- Find the video and click the blue 'Embed' button
- Save the Page, and Publish the Page
Using an Embed Code
- Have the Embed code ready from your source.
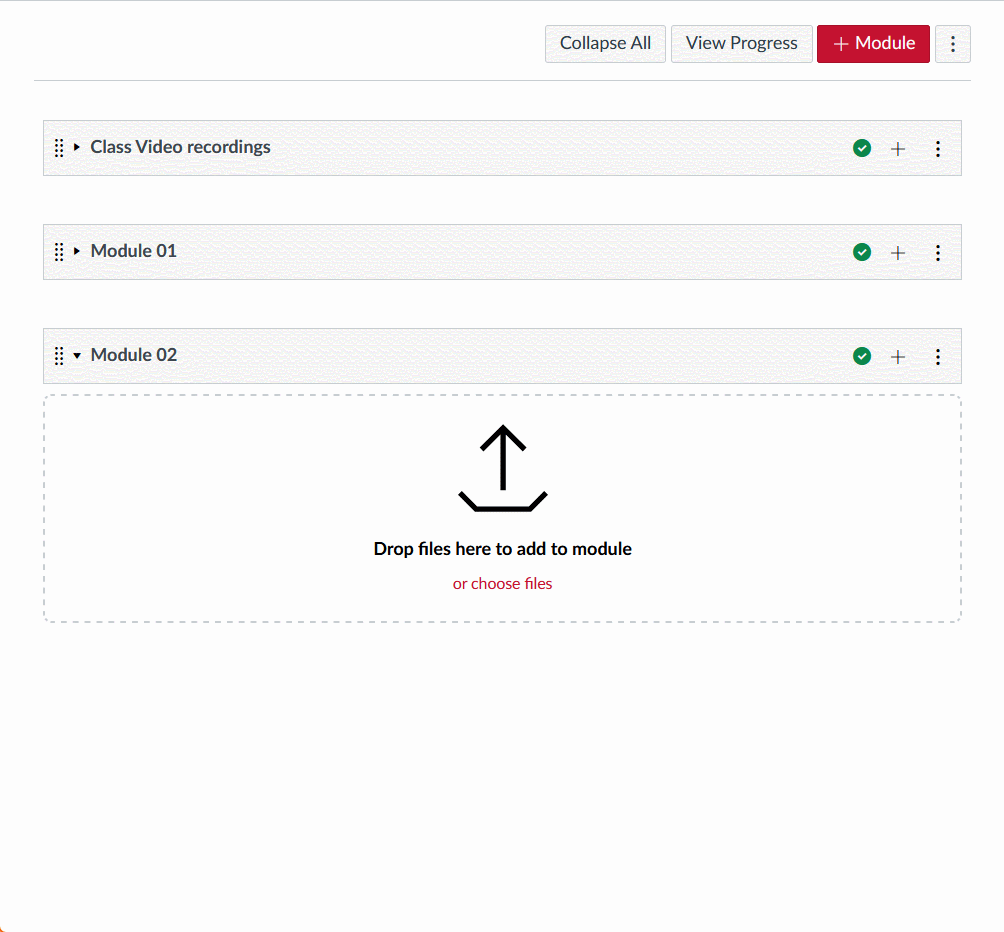
- Go to your Course shell and select Modules.
- Next to the desired module, click the '+' to add an item to that module.
- On the Add Item pop-up window, change Assignment to Page.
- Either add a [New Page] or use the page already created.
- Click Add Item.
- Click Edit to open the Rich Content Editor.
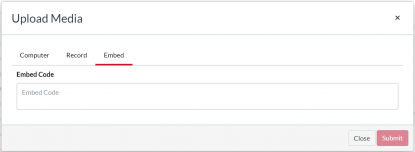
- Select the three dots on the far right side and then select the cloud icon:

- Paste the embed code and select Submit:
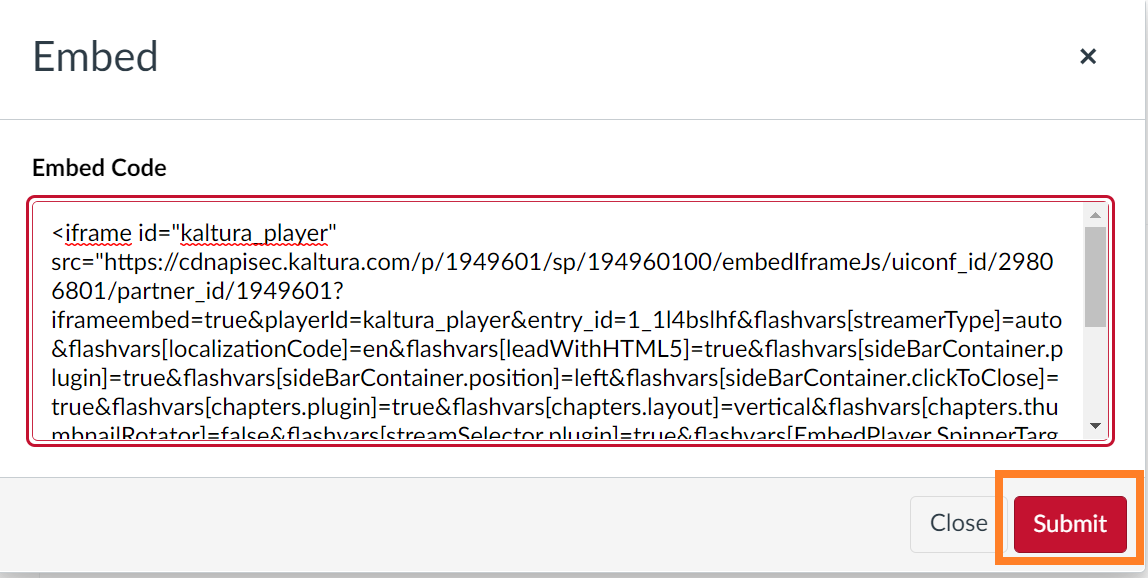
- Save the page and Publish as appropriate.
Using URL (e.g. Zoom in the Cloud):
- Have the URL ready
- If you need the URL for Zoom Cloud video, please visit our Zoom webpage for help
- Go to your Course shell and select Modules
- Click the '+' for the desired module to add the video
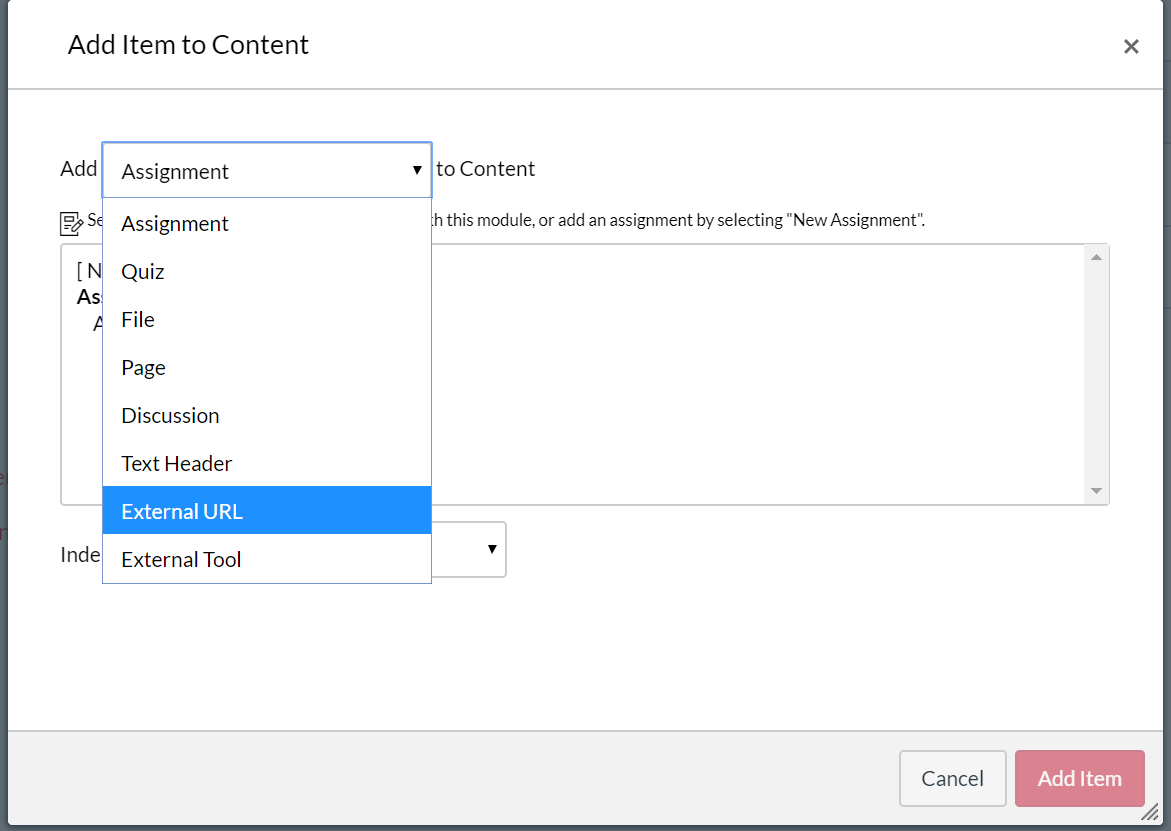
- On the Add Item pop-up window, change Assignment to External URL
- Paste the URL into the 'URL:' text box
- Provide a Page Name and click 'Add Item'
To share a video saved on your computer (e.g. Zoom on your computer):
- Make sure the video is already uploaded on MyMedia
- If you need the embedded code for the video, please visit our Kaltura webpage for help
- Go to your Course shell and select Modules
- Click the '+' for the desired module to add the video
- On the Add Item pop-up window, change Assignment to Page
- Either add a [New Page] or use the page already created
- Click 'Add Item'
- Click 'Edit' to open the Rich Content Editor
- Select the Media icon
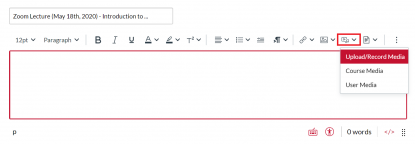
- Select Upload/Record Media
- Click the Embed tab on top in the pop-up window
- Paste the embedded code in the text box and Click Submit
Embed a Playlist from Kaltura MyMedia 🎥
Embed a Playlist from Kaltura MyMedia 🎥
This video reviews how to embed a playlist from Kaltura MyMedia into a Canvas shell:
For additional information on creating and managing playlists with Kaltura MyMedia, visit our Kaltura page.
Enable or Disable Course Menu Items 🎥
Enable or Disable Course Menu Items 🎥
Please review the video or step-by-step instructions to learn how to enable course menu items.
Video Overview
Step by Step Instructions
-
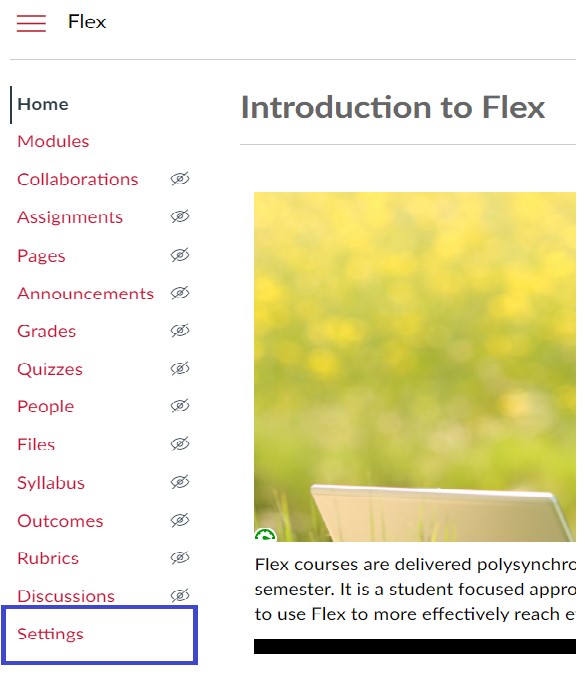
To edit the items that appear in a course’s menu, first click on the Settings link:
-
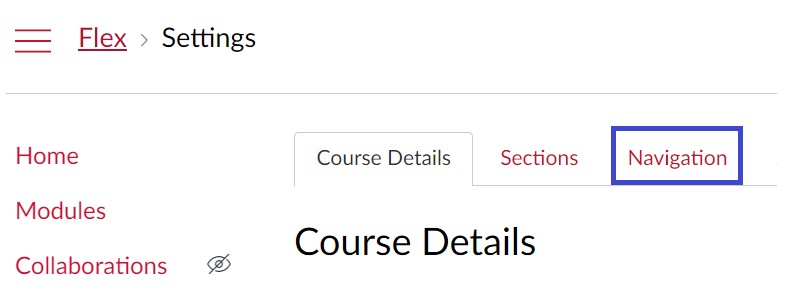
Then, click on the Navigation tab:
-
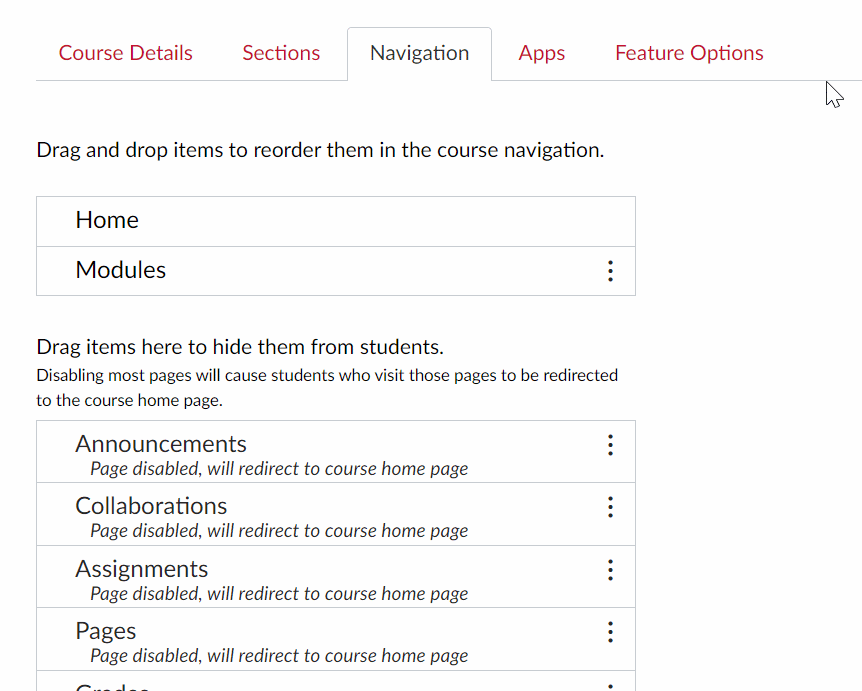
Once there, simply drag and drop the items to reorder them in course navigation. In this example, I am publishing the Announcements option for students by finding the Announcements option, dragging it to the top, and selecting Save.
-
Once saved, the menu option will be visible to students.
Choosing 'Disable' will remove an item from the course menu. Note that some disabled items may still be visible to instructors.
Enable Zoom as a Course Menu Item 🎥
Enable Zoom as a Course Menu Item 🎥
Please review this video to learn how to enable Zoom as a course menu item:
Excuse an Assignment or a Test
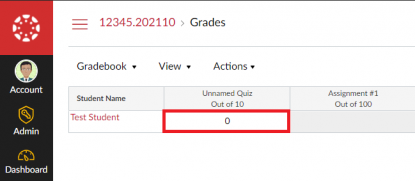
Excuse an Assignment or a Test
Students may join a course after the due date of an assignment. Sometimes you may assign a different project to a student. In those cases, you might have to exempt the student from an assignment or a test. Canvas allows you to do that on the Gradebook. When a particular item is marked as 'Excused,' the points will not count against the student's total score.
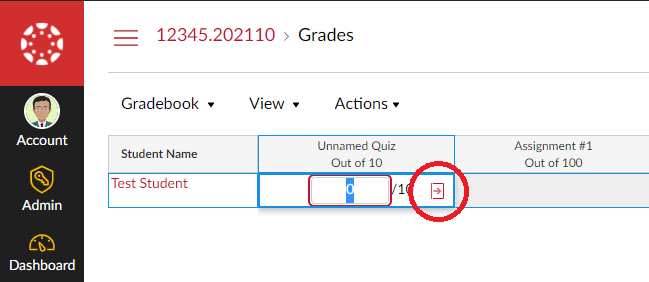
Go to the Gradebook and click anywhere on the score you want to excuse.
Then, click the arrow appearing next to the score.
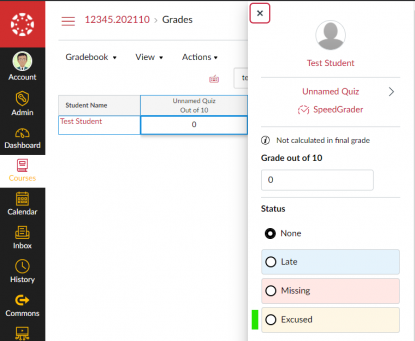
A panel will appear on the right. It will allow you to change the status to 'Excused' for that assignment or test.
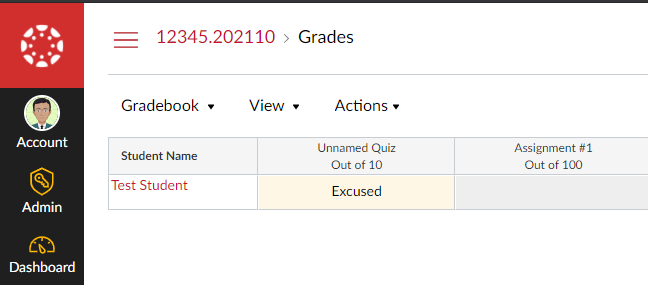
The word 'Excused' will replace the original score in the Gradebook.
Favorite or Unfavorite Courses (Inbox and Dashboard)
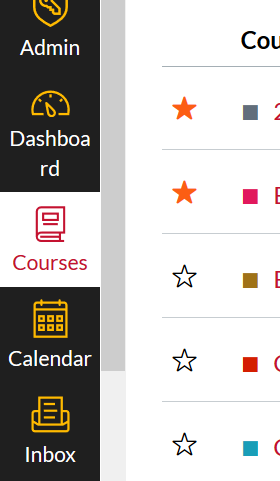
Favorite or Unfavorite Courses (Inbox and Dashboard)
On the Canvas Dashboard, you may have tiles from courses in the past. You may also have tiles for the following semester. These courses also show up in your Inbox as "Favorite Courses" and they could have the same name. It can be difficult to distinguish which ones belong to this semester.
This is why you should mark or unmark your favorites! Only the marked courses will show up on Dashboard and "Favorite Courses" in Inbox. Otherwise, Canvas assumes all courses are favorites and your dashboard can get cluttered.
To adjust favorite courses:
- Find Courses on the global menu to open the course panel.
- Select All Courses at the bottom of the panel.
- Adjust the course as a "Favorite" by clicking the star:
- Click an empty star to turn the star orange. This indicates that the course is now a "Favorite" and will show up on your dashboard and inbox.
- Click an orange/full star to turn the star empty. This indicates that the course is no longer a "Favorite," and it will not show up on your dashboard and inbox favorite category. However, you will still have access to this course through steps 1 and 2 above.
- The choices are saved automatically.
- Go to Dashboard to confirm the changes.
Give a Student a Different Due Date or Amount of Test Time
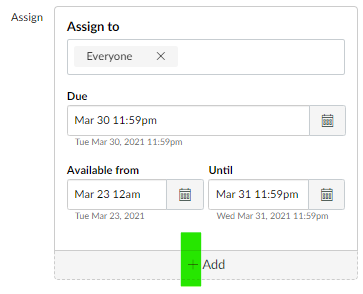
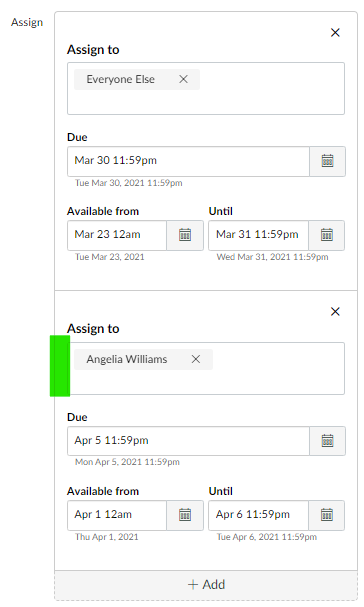
Give a Student a Different Due Date or Amount of Test Time
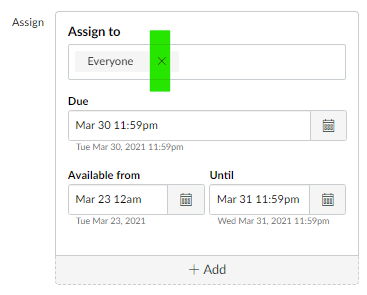
In situations where a student needs a different due date for an assignment or a quiz because of unforeseeable circumstances, you don't need to set up another assignment/quiz.
You can simply assign the student with a different set of dates. At the bottom of the 'Assign' box, click '+Add' to open another set of settings.
When you add a student to a different set of due and available dates, 'Everyone' from the original set of dates becomes 'Everyone Else.' This excludes the student(s) in this new group of dates.
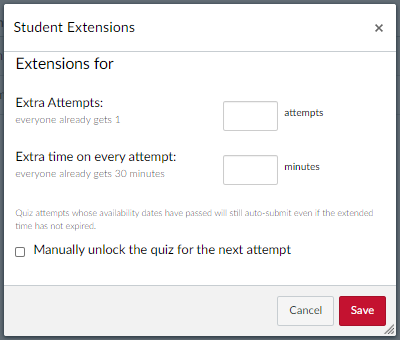
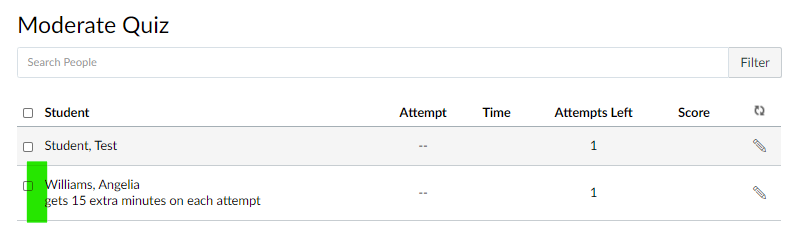
If a student needs extra amount of time or an extra attempt in a quiz, then you will have to use the 'Moderate This Quiz' option.
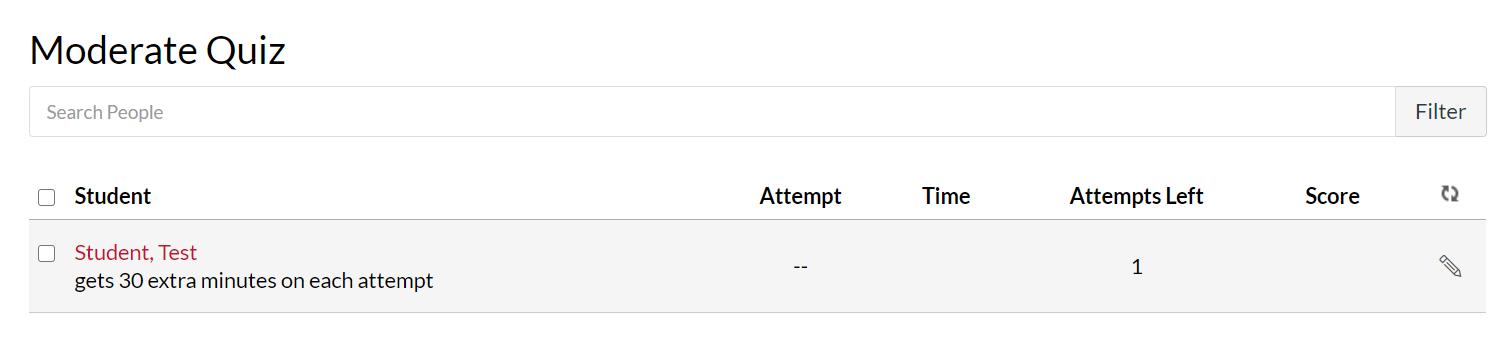
Note that this is EXTRA. If other students have 1 attempt and you'd like this student to have 2 attempts, then enter 1 (2 - 1 = 1) in the 'Extra Attempts' box. Likewise, If other students have 30 minutes per attempt and you'd like this student to have 1.5X or 45 minutes, then enter 15 (45 - 30 = 15) in the 'Extra time on every attempt' box.
Once you click the 'Save' button for the extra attempts or minutes, a statement will appear under the student's name.
Give an Assignment or a Quiz to One Student
Give an Assignment or a Quiz to One Student
Note that this How-to Guide is different from the situations in which one student has a different due date or an extended amount of testing time from other students. Please see 'Give One Student a Different Due Date or Amount of Time' for more information.
For situations similar to which a student cannot submit a paper in class or take a paper-pencil quiz because of an illness, you may provide that student a different option. In this case, only this student or a small number of students will submit the assignment or quiz on Canvas.
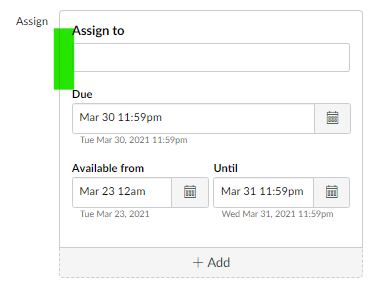
You will set up the assignment or quiz like you would for the entire class. Then, you can change the 'Assign to' option. The default option is always for 'Everyone.' Click the 'x' next to 'Everyone' to remove it from the box.
When you click the 'Assign to' box, you will see a list of students and some group options. When the list is long, it may not show the student's name. In that case, entering the student's name (first or last) in the box will continue to shorten the list.
Click the student's name to select the student. If you have only one name, this assignment or quiz is assigned to only one student. You can enter as many students as needed. Enter the Due date for the deadline. The Available from and Until is the period these student can access this item. Once the Until date is passed, it will no longer be available to them.
Import (copy) content from one Canvas shell to another
Import (copy) content from one Canvas shell to another
To import existing content from another Canvas shell, you start from the course you are working on and pull the content in from another shell.
- Find Settings at the left lower corner, click 'Import Course Content' on the right hand side
- Choose Content Type: Copy a Canvas Course
- Type the name of the course (e.g. ENG101) and select the source
- Choose the content to import
- 'Select Specific Content' allows you to select particular items (e.g. a single Assignment) before importing
- 'All content' will import everything from the source as in true Course Copy
- If you chose 'All content' in Step 4, check the box for 'Adjust events and due dates'; adjust the first date of the semester and all due dates will be adjusted accordingly
- Click the 'Import' button
- If you chose 'Select Specific Content' in Step 4, click the 'Select Content' button next to the progress bar
- On the pop-up window, pick the items to import and click the 'Select Content' button at the bottom of the pop-up
Integrate the Library into a Canvas course
Integrate the Library into a Canvas course
There are options in Canvas for connecting the students with library resources, library instruction, and librarian assistance. Detailed instructions for each option are available in this guide. Please contact the library at reference@waubonsee.edu if you need any additional assistance.
Migrate a Blackboard Learn shell to Canvas
Migrate a Blackboard Learn shell to Canvas
Blackboard Learn courses are automatically being migrated to Canvas for summer 2020. If you would like to migrate a course on your own, please see the 'How do I import content from Blackboard 6/7/8/9 into Canvas?' Canvas Community Guide, the 'Importing from Blackboard' video above or the following instructions.
Always be mindful that content originated from a different system appears/behaves differently. It is a good practice to import those content to a Canvas sandbox first. Arrange everything there before sending it into the actual course.
- Create a Sandbox on Canvas and use a unique name
- Go to the Blackboard shell > Course Management > Packages and Utilities > Export
- Click 'Export Package' and choose the content to export
- Wait for the .zip file to be available within a few minutes, use the 'Refresh' button to check
- Click the .zip name and save it in the local computer
- Go to Canvas and find the sandbox created in Step 1
- Find Settings at the left lower corner, click 'Import Course Content' on the right hand side
- Choose Content Type: Blackboard 6/7/8/9.x export .zip file
- Find the file from Step 5
- For PC users, click 'Choose File' and select the file from Step 5
- For Mac Users, open Finder, find the folder from Step 5 and drag it to the 'Choose File' button
- Select 'All content', then click the 'Import' button
New Analytics and Communication Workshop 🎥
Question Banks with Classic Quizzes Workshop 🎥
Schedule Zoom Meetings in Canvas
Schedule Zoom Meetings in Canvas
*In order to schedule Zoom meetings from within Canvas, you need to enable Zoom as a menu item in your Canvas course. Please follow the instructions, located under the title "Enable Zoom as a Course Menu Item" on this page, before attempting these instructions.
You can schedule Zoom meetings from within Canvas. These meetings can be set up for single class sessions or as a series of recurring meetings.
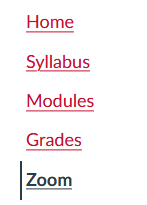
- Select Zoom from your course navigation menu:
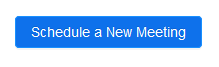
- From the Zoom link, click the Schedule a New Meeting button:
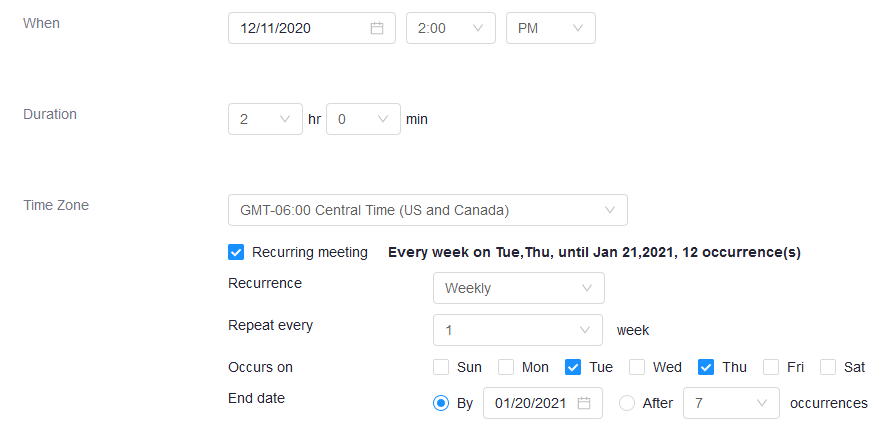
- Set the When, Duration, and Recurring options as desired:
- Press the Save button after you have confirmed your settings:

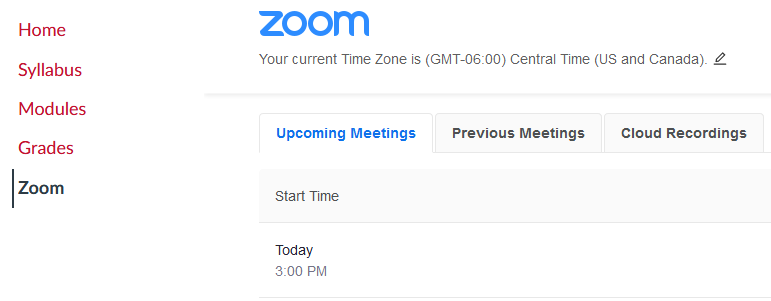
- Now both you and students will be able to see the upcoming meeting(s) from the Zoom link:
SpeedGrader Workshop 🎥
Syllabus (or any file) Upload/Embed/Publish 🎥


Syllabus (or any file) Upload/Embed/Publish 🎥
Please review the video or step-by-step instructions to learn how to upload, embed, or publish a syllabus or any file.
Video Overview
Step by Step Instructions
There are two easy ways to upload a file, either from the Rich Content Editor or using Files. While files could be uploaded from the Rich Content Editor, they may not be organized in a way for you to find them easily. Using Files allows you to choose how to organize them.
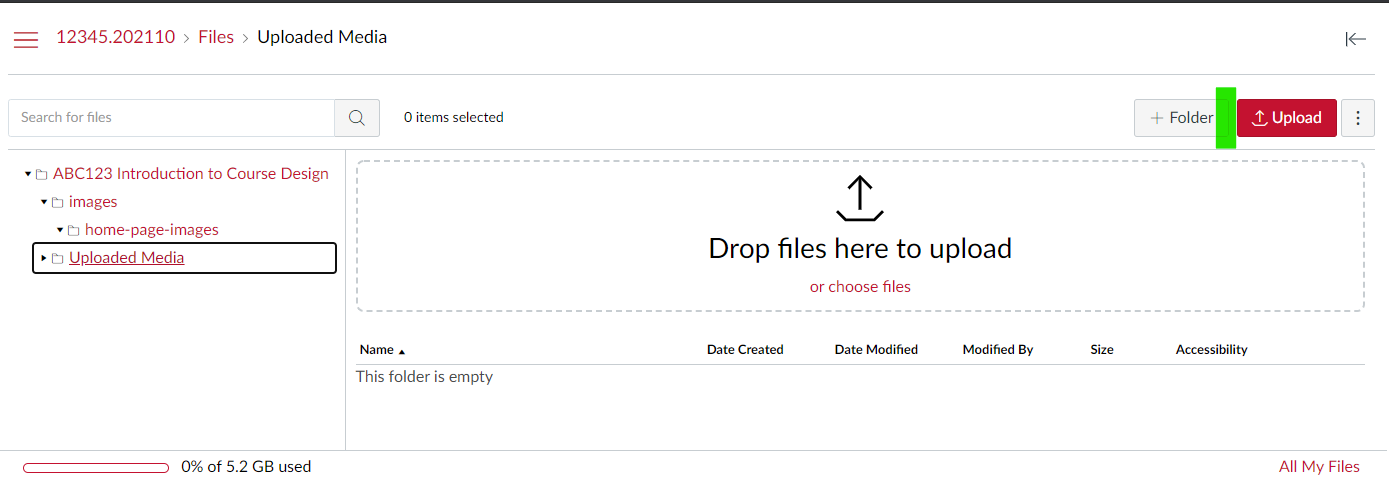
On the menu, click Files.
Go to the directory at where you'd like to house that file. Then, click the Upload button.
A pop-up window will appear for you to find the file on your computer. Once you select the file to upload, after a few seconds, the file should appear in the directory.
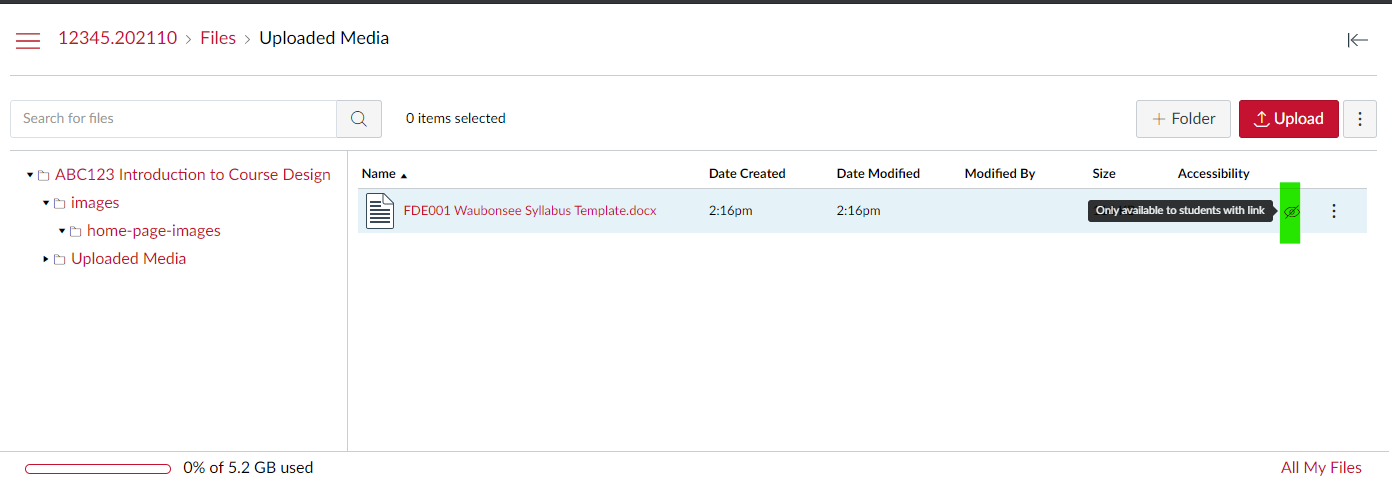
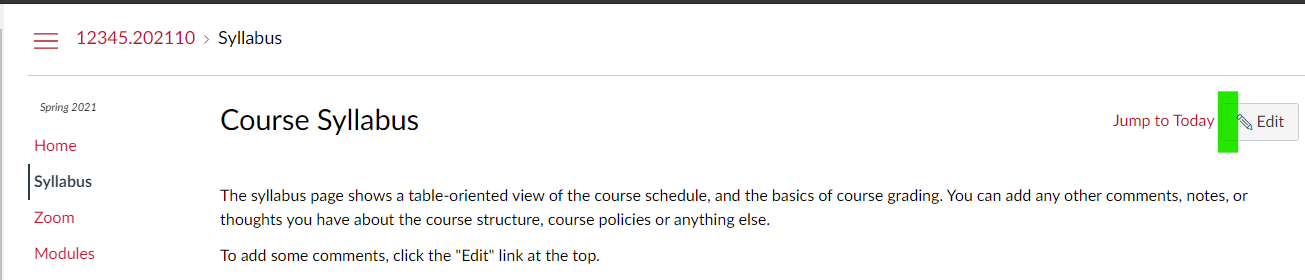
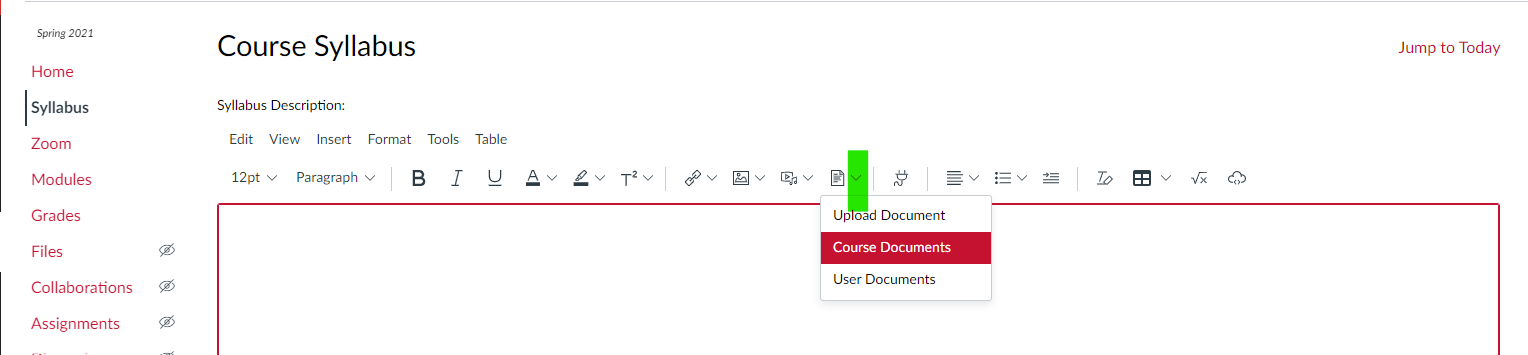
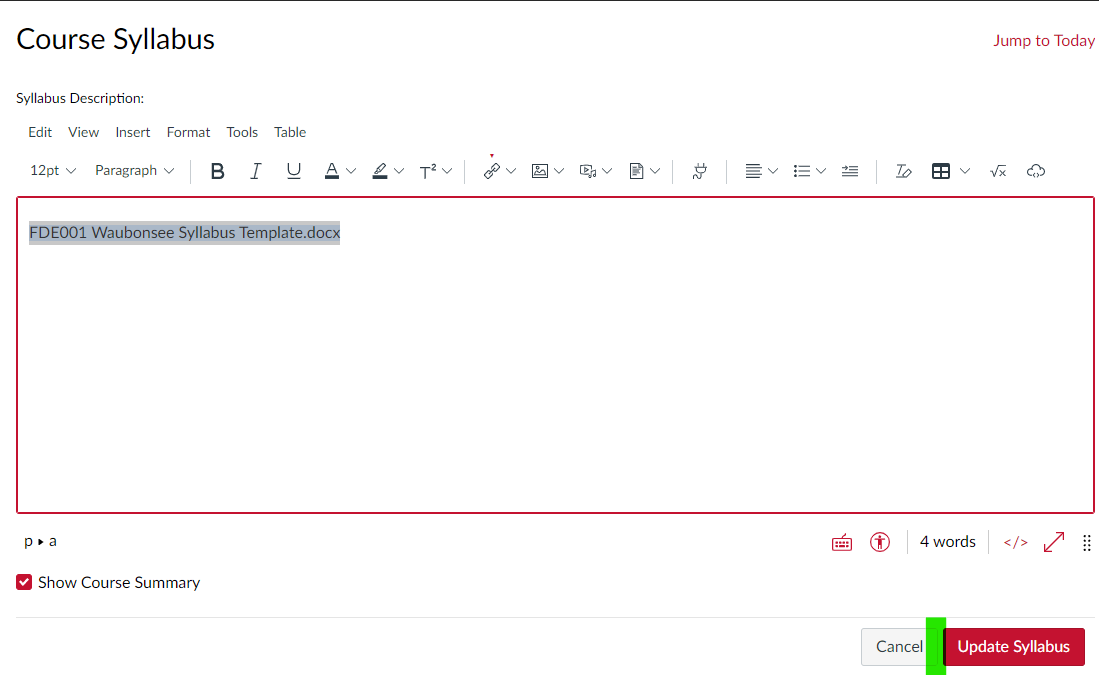
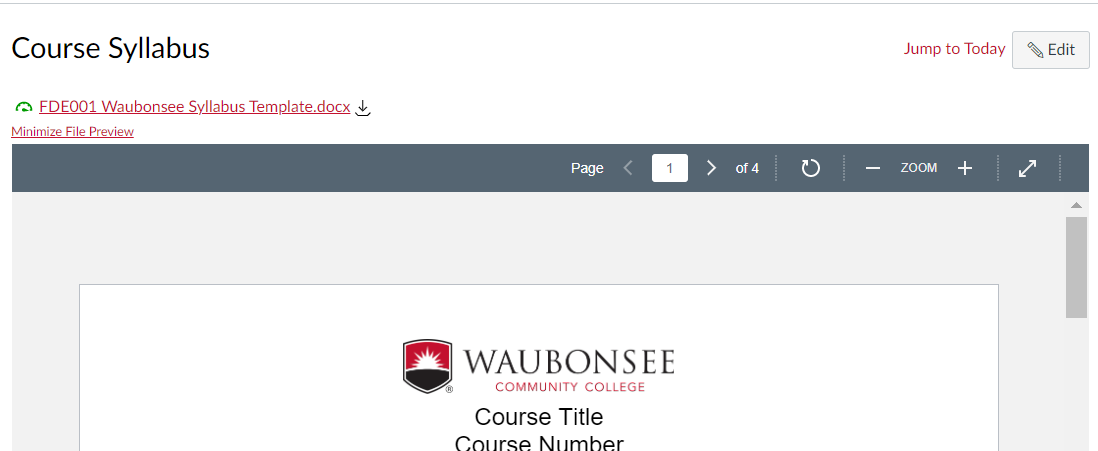
Each file has its own publishing settings. The default setting typically allows students to see the file if you embed it in a Page. Let's use syllabus as the example. Click Syllabus on the menu. On the Course Syllabus page, click the Edit button.
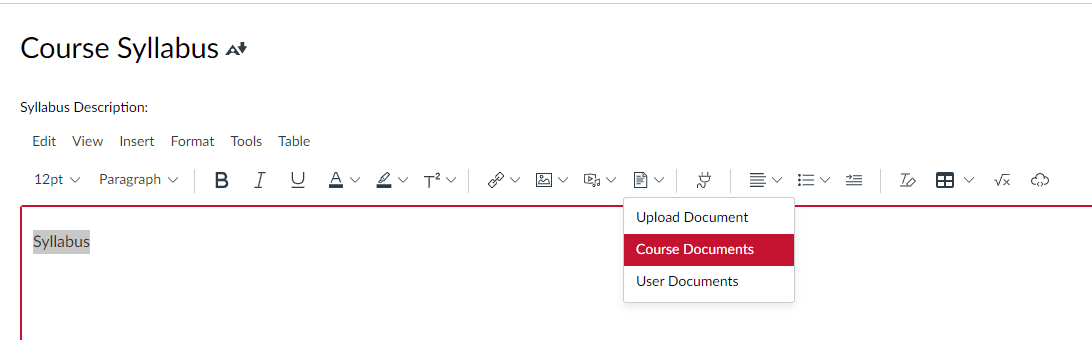
(Optional but recommended) In the editor box, if you'd like to enter a meaningful name that's easy for students to understand, please do so. Highlight the text you entered.
Click the down arrow and choose Course Document (if you didn't enter any text in the editor, the document filename will be used; and if you didn't upload the file above, this is where you can choose Upload Document instead).
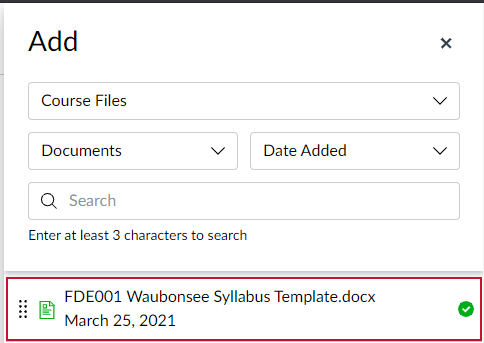
A panel on the right will appear and allow you to select the file.
When you click the file you want, a yellow flash appears in the Rich Content Editor for a second to indicate that an item is embedded. (If you didn't any meaningful text, the filename will be used.)
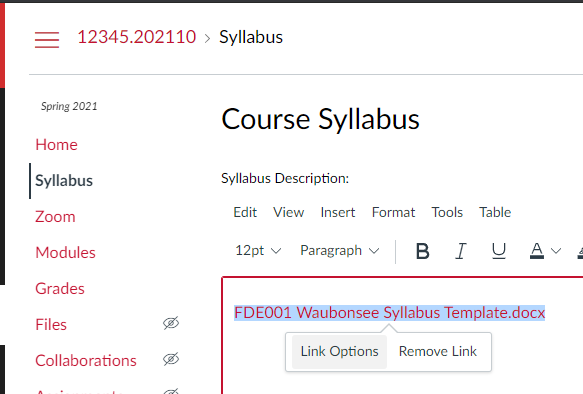
When you click the item, you may choose the Link Option. This allows you to make Inline Preview available.
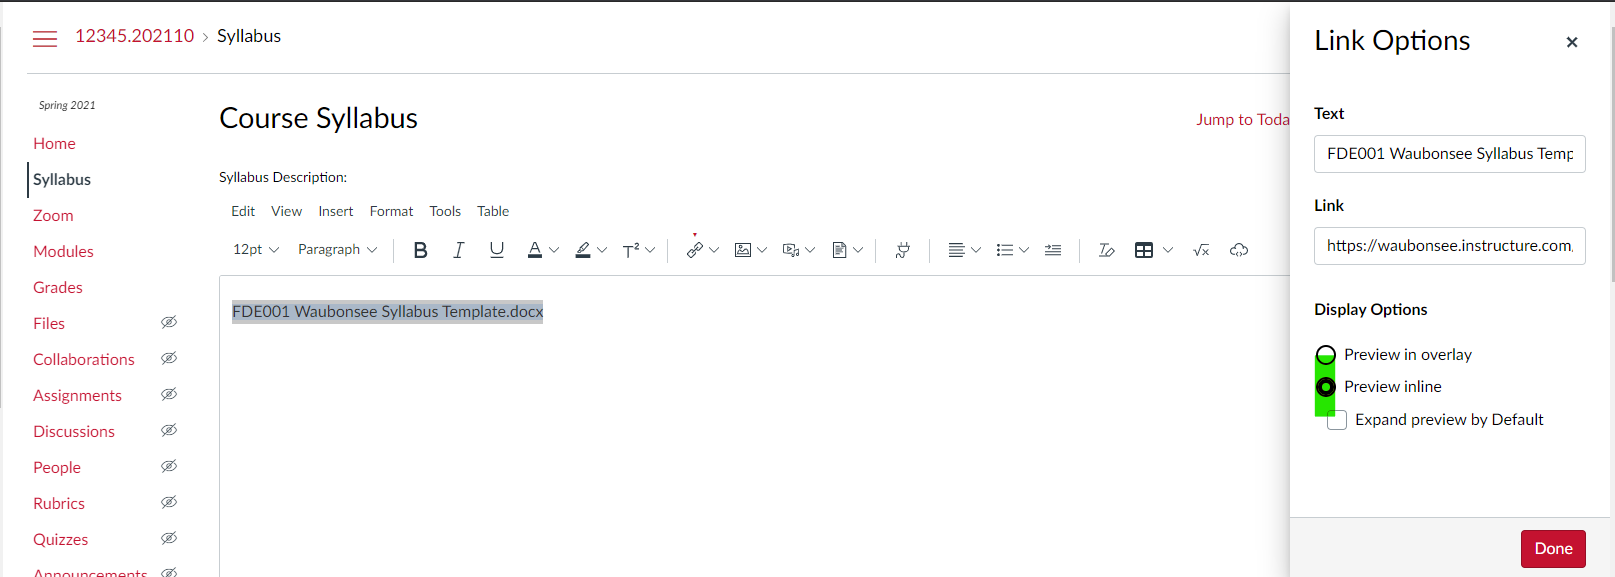
There are two options: Preview in Overlay and Preview Inline.
Preview in Overlay (default): when students click on the link, it will open a new tab.
Preview Inline: when students click on the link, it opens the document directly below. Click Done after making your decision. And then click Update Syllabus to save.
Refresh the browser window to confirm. If you chose Preview Inline, the following is what you/students will see after you click the document name.
Top Canvas Guides
- How to Create Quizzes in Canvas LMS
- How to Use Gradebook in Canvas LMS
- How to Use Assignments in Canvas LMS
- How to Cross List Sections in Canvas LMS
- Please see the Policies and Procedures page for important FERPA related information before cross-listing sections.
- How to Import Course Content into Canvas LMS